Client Certificates: IIS Setup
This week we're going to look at setting up a website in IIS that requires client certificate authentication to access. You'll need to have gone through at least parts two and three in order to follow along with this post.
Articles in this series:
Introduction
Client certificates are commonly used to authenticate a client with a service provider. Typically the client will generate the client certificate, as it is required for the client to hold on to the private key. The client will pass the public key to the service provider, who will configure their service to accept and trust that public key, while typically mapping that public key to a particular user on the server side. Client certificates can be generated on your own or purchased through a generally trusted certificate authority.
In this post, we'll be generating a client certificate signed by your root certificate and configuring the SSL site you set up in part three to associate that client certificate with a user on your system, as well as explore the IIS option to disallow, accept, or require a client certificate on connection.
Lastly, we'll validate that we've set up our site properly by visiting your local SSL-enabled site in a browser and ensuring that the client certificate gets passed properly.
Step 1: Validate your existing setup
If you've been following the previous posts, ensure that:
- Your MyRootCert.cer file has been imported to the Trusted Root Certification Authorities of both your user and local computer stores.
- That your my.local.machine certificate has been imported into the local computer's personal store.
- That your SSLSite web site has been set up in IIS properly with an HTTPS binding and is accessible by hitting https://my.local.machine:port/ with no certificate errors.
Step 2: Generate your client certificate
Open up a command prompt and navigate to the certificate directory you've been working in and run the following command:
makecert.exe -iv MyRootCert.pvk -ic MyRootCert.cer -n CN=MyClientCert -len 2048 -pe -sv MyClientCert.pvk -sky exchange -b 01/21/2010 -e 01/21/2020 MyClientCert -eku 1.3.6.1.5.5.7.3.2
The only difference in the command here vs the server certificates we've been generating is the -eku parameter, which is set to the value to specify a client certificate.
Once again, you'll be prompted to set a password for your client cert's private key (I did not, but you should for a production environment), and asked for MyRootCert's private key password in order to sign the client cert (which I had set to 'learning').
Next, run pvk2pfx.exe in order to generate MyClientCert.pfx:
pvk2pfx.exe -pvk MyClientCert.pvk -spc MyClientCert.cer -pfx MyClientCert.pfx
Step 3: Import your client certificate into your user's personal certificate store.
Now open up your Microsoft Management Console (Win+R, mmc, <Enter>) and add the certificate snap-in by going to File->Add/Remove Snap-In. Click on 'Certificates' in the left panel, then click add. Add the snap in for your current user.
Now import the MyClientCert.pfx file into your current user's personal certificate store, but ensure you mark the certificate as exportable, as shown:
Step 4: Getting the base64 encoded certificate
In order to set up IIS, you'll need the base64 encoded version of the public key certificate. Take the following steps:
Finish up the wizard and name the certificate MyClientCertBase64.cer.
Now head to the directory where MyClientCertBase64.cer is, and open it in a text editor. You should see something like this, but the string will be different:

We'll do something with this further down.
Step 5: IIS Enhancement
Follow the instructions in IIS Client Certificate Mapping Authentication under 'setup' to install the support in IIS for client certificate mapping, replicated below for your convenience, which adds support for client certificate mapping. The linked page is worth reading, as it also explains the parameters we are going to set up in Step 6.
WINDOWS SERVER 2008 OR WINDOWS SERVER 2008 R2
The only difference in the command here vs the server certificates we've been generating is the -eku parameter, which is set to the value to specify a client certificate.
Once again, you'll be prompted to set a password for your client cert's private key (I did not, but you should for a production environment), and asked for MyRootCert's private key password in order to sign the client cert (which I had set to 'learning').
Next, run pvk2pfx.exe in order to generate MyClientCert.pfx:
pvk2pfx.exe -pvk MyClientCert.pvk -spc MyClientCert.cer -pfx MyClientCert.pfx
Step 3: Import your client certificate into your user's personal certificate store.
Now open up your Microsoft Management Console (Win+R, mmc, <Enter>) and add the certificate snap-in by going to File->Add/Remove Snap-In. Click on 'Certificates' in the left panel, then click add. Add the snap in for your current user.
Now import the MyClientCert.pfx file into your current user's personal certificate store, but ensure you mark the certificate as exportable, as shown:
 |
| Ensure the middle and last checkboxes are checked. |
Step 4: Getting the base64 encoded certificate
In order to set up IIS, you'll need the base64 encoded version of the public key certificate. Take the following steps:
 |
| Right click on MyClientCert in the Current User's Personal Certificate Store, go to All Tasks->Export |
 |
| Click 'Next' |
 |
| No, do not export the private key |
 |
| Select 'Base-64 encoded X.509' |
Finish up the wizard and name the certificate MyClientCertBase64.cer.
Now head to the directory where MyClientCertBase64.cer is, and open it in a text editor. You should see something like this, but the string will be different:
We'll do something with this further down.
Step 5: IIS Enhancement
Follow the instructions in IIS Client Certificate Mapping Authentication under 'setup' to install the support in IIS for client certificate mapping, replicated below for your convenience, which adds support for client certificate mapping. The linked page is worth reading, as it also explains the parameters we are going to set up in Step 6.
WINDOWS SERVER 2008 OR WINDOWS SERVER 2008 R2
- On the taskbar, click Start, point to Administrative Tools, and then click Server Manager.
- In the Server Manager hierarchy pane, expand Roles, and then click Web Server (IIS).
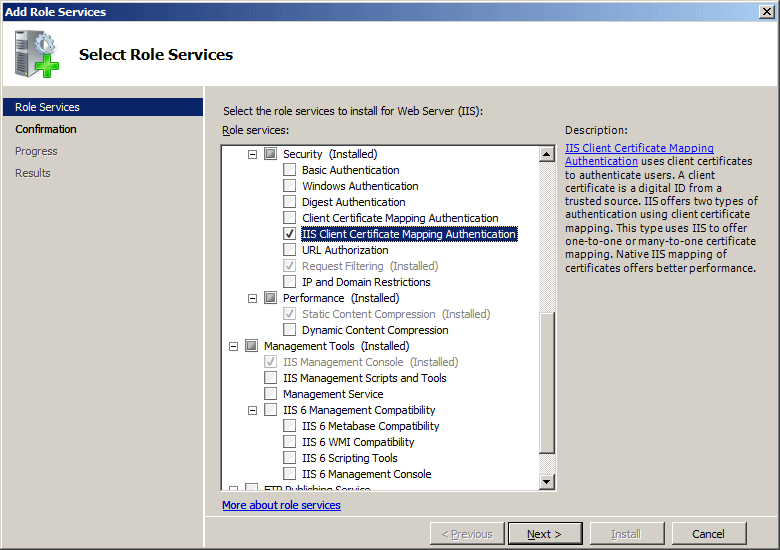
- In the Web Server (IIS) pane, scroll to the Role Services section, and then click Add Role Services.
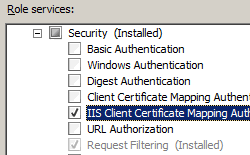
- On the Select Role Services page of the Add Role Services Wizard, select IIS Client Certificate Mapping Authentication, and then click Next.
- On the Confirm Installation Selections page, click Install.
- On the Results page, click Close.
WINDOWS VISTA OR WINDOWS 7
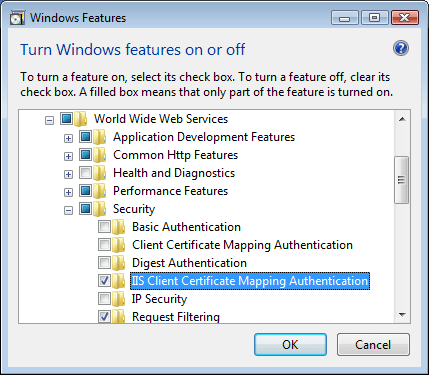
- On the taskbar, click Start, and then click Control Panel.
- In Control Panel, click Programs and Features, and then click Turn Windows Features on or off.
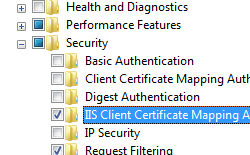
- Expand Internet Information Services, then select IIS Client Certificate Mapping Authentication, and then click OK.
Step 6: IIS Configuration
In IIS, select your SSL site, then click on configuration editor:

You should see something similar to the following after setting 'Section' to 'system.webServer/security/authentication/iisClientCertificateMappingAuthentication'.

Now enter the following values:
Section: system.webServer/security/authentication/iisClientCertificateMappingAuthentication : This sets the section of the configuration we are going to edit, pulled from the documentation site linked here.
From: ApplicationHost.config <location path='SSLSite'/> - sets the config file to edit.
enabled: True - turns on client certificate mapping authentication
logonMethod: ClearText - descriptions of the different types are in the documentation.
Ensure oneToOneCertificateMappingsEnabled is assigned to true, then click on the 'oneToOneMappings' row and click on the ... button that appears on the end of the row.
You should see a screen like:

This is the screen that lets you input a client certificate and map it to a single user. Click 'Add' on the right, and for the new user, set 'enabled' to 'true', and input the username and password of the windows user you want to be associated to your certificate (this can be the same logon you are currently using on your machine).
For the certificate, head back to your MyClientCertBase64.cer file. open this in a text file, remove the very first line (-----BEGIN CERTIFICATE-----) and the very last line (-----END CERTIFICATE-----) and collapse the base64 encoded representation of your certificate to a single line. Copy and paste this line into the certificate field. Your window should look something like:

Close the window, and you should now see a Count=1 next to your oneToOneMappings line in the configuration edit. Click 'Apply' on the top right.
Click back on your SSL site to return to the following view and click 'SSL Settings'.

Check the 'Require SSL' box, then check 'Require' under 'Client Certificates', then 'Apply' on the top right. Note the other options here, and note that you can only pass in a client cert if you've got an SSL connection established to the server.

IIS Should be all set up now.
Step 7: Validating you need the cert to access the site.
Before you try to connect to your site in a browser, open up IE. Press F10 if you can't see the menu bar, then click tools, internet options, click on the security tab, click 'local intranet', and click 'custom level'. Under 'Miscellaneous', select 'Disable' for "Don't prompt for client certificate selection when only one certificate exists."
This will ensure you'll get a popup asking you which cert to pass to the server, validating that the server is asking for your cert.
Click OK to save your custom level settings, then OK to save your internet options.
Access your site via IE by going to https://my.local.machine:port/ (remember, port is what you set up in Part 3 in your site bindings).
You should be prompted to supply your client certificate, but if not, click File->Properties to ensure that you changed your security settings for the correct zone that IE detects your site in.
If everything works properly, you should see:

And once you click OK, you should see your site content, successfully having presented the certificate:

As an exercise, you can feel free to remove MyClientCert from your Personal Store temporarily to see what comes up when you try to access your site again, proving that the cert is required to access the site (be sure it re-import MyClientCert.pfx afterwards, as we'll likely re-use this cert in subsequent posts).

There are quite a few additional settings in IIS for mapping client certs. Feel free to read over the documentation and understand the settings yourself in order to learn more.
Step 8: Validating you're logging in as the correct user

Conclusion
That's it for this post. Keep your certificates and setup around, as eventually I want to get into explaining how to call into web services that are hosted on this site and passing in the client cert via .NET code.
Let's ensure now that you're actually hitting the site as the logged in user. Open up IIS Manager, click on SSL site, and double click on Logging. Ensure your format is set to W3C, and click on 'Select Fields', ensuring that cs-username is selected. Click OK to save and close the select fields box, and note the directory of the logs. Open up the log directory and find the logs for SSLSite. Open up the latest ones, and you should see the username you configured inside the logs (mine is tchawla), whereas if you look at old logs, a - would be present for the username instead.
Conclusion
That's it for this post. Keep your certificates and setup around, as eventually I want to get into explaining how to call into web services that are hosted on this site and passing in the client cert via .NET code.
No comments:
Post a Comment